THE POLY
When preparing this project
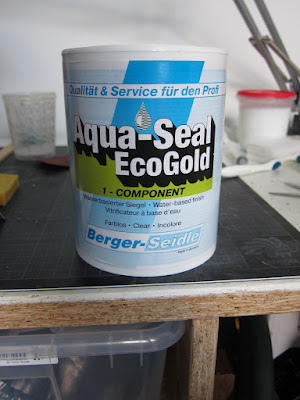
I went hunting for a suitable waterbased transparent varnish, also called "poly". After some
research and some price comparison, I came up with this product: Berger-Seidle
Aqua-Seal EcoGold. Berger Seidle is a German brand which specializes in
woodfloor finishes.
I chose
this product among others for a couple of reasons:
- Good value: 27 euros for 1 liter (27 $ a quart)
- Dries crystal
clear, while more expensive wood finishes (from Akzo Nobel for example) are always
yellowish
- Available
on request by the liter at my local professional woodfloor store
- Scratch
resistant - at least supposedly, but since it's a floor finish, I have a tendency to believe it...
- German stuff! Noch besser! Qualität & Service für den Profi
It makes me
think about the products made by the US company Aquacoat, used by some
instrument builders out there. They sure do share some components.
 |
| Despite its milky appearance, it does dry crystal clear. |
THE PROCESS
The whole poly application turned out to be way more
challenging than expected. So I am going to focus on what worked for me
instead of describing the less happy times...
1. Sand the shellac sealer. I've tried several grits, but if I had to do it again, I would go directly for P400 dry (SIA siarexx fine is a great product). Don't go too far, you don't want to expose stained wood.
NOTE:
don't wet sand shellac, it's too risky. I had issues, though it's unclear why.
2. Mount the shells on small feet, to be able to work from top to bottom, along the grain, and avoid drips. I actually took advantage of the lug mounting holes to screw legs made from scrap wood strips.
3. Afterwards, all holes are filled with plugs, to avoid drips. Poly is thick
and will get you drips I you don't do something. I used balsa plugs glued with
rubbercement for easy removing.
4.
To keep it low-tech and to be able to do this at home, I got myself into brushing. I know it
might sound crazy to the "paint-booth fanatic", but that's doable - as
long as you're not in a hurry. For instance, terrific drum builder from Scotland Frasier Murray does it. And gets amazing results.
I started with choosing a good brush. What worked best for me is an artist spalter brush, 50mm (2") wide, with very smooth synthetic bristle. I got mine from an art supply store - downtown Brussels. They're relatively inexpensive, you can find some mid-range quality for around 6-7 euros. The one I used is an
AMI 170 series.
Note: between shellac and poly, I fixed minor flaws or
discoloration in the stain by brushing a mix of concentrated stain (I let stain evaporate for a couple of days) and
poly. This worked quite well. I should have done that earlier, before applying shellac, on all the spots where stain wasn't properly absorbed, instead of my attempts of fauxing (see old article) which mostly proved unsatisfying.
5. Work as fast as possible on small sections keeping a wet edge, and use the
appropriate amount of poly, too much will get you drips or uneven build,
too little won't give you enough thickness for sanding.
 |
| The wet edge. |
6. Apply 5 coats with light P400 sanding between coats: this should remove dust grains, paint lumps, fibers and sort of lightly scratches the surface. Big drips can be carefully flattened using a piece of sandpaper glued on a polyurethane block.
Applying medium thin coats doesn't give you a very glossy finish, it's rather satin, but very smooth with light brush marks.
Since one
coat
(ca. 1.5 sq meter) uses up to 50 ml of varnish, 1 liter is far
enough. Brushing is definitely the most efficient application method in
terms of coverage.
I applied the fifth coat a little thicker, using a flat brush like this one:
 |
| It's a Goudhaantje futura intended for waterbased finishes. |
A couple of weeks before finishing writing this more comprehensive article, I
posted a few pictures of the shells after a first batch of coats. The result might look good from a distance, but a
close-up view shows that it isn't quite what you would expect from a
high gloss instrument finish: it's full of dust inclusions, brush
strokes and it's rather satin gloss than tabletop gloss.
 |
| Here it is again. Looking good from afar, but it's just a picture... |
After 5 coats, the finish needs to be sanded flat: no more drips, brush marks, nor
dust grains. I actually added one step in the sanding process by working with a P500/P600 superfine sanding sponge. The sponges allows the pressure of the hand to be equally spread on the surface and that sanding follows the curve of the shell. Note: the process will be repeated twice, for a total of 15
coats.
Here's the surface after the 10th coat.
 |
| In the result I'm trying to
achieve, the reflection must be perfectly mirror like and sharp, which is not the case here. |
 |
| You can see the brush strokes starting to be sanded off, after some P320 sanding. P400 is also fine. |
 |
| Here the second step of the process, using a double sided superfine (P500/600) sanding sponge from the SIA brand. This thing works really well. No more brush strokes, only the normal scratches from the sanding. I still sand along the grain. Man, how amazing this stained beechwood looks! |
 |
| An overview of my sanding supply: sanding sponge, sanding block (to remove drips), some sandpaper pieces. Nothing fancy, just regular DIY stuff. |
There it
is, after 15 coats. A nice clear finish, smooth satin gloss, but not “tabletoppish”
glassy gloss.


